Camping allows me to reconnect with nature, the outdoors, and the fresh air. My camping setup is not so streamlined to handle hiking the pacific coast trail; however, all my gear fits in my Subaru Outback and when I arrive at my destination, I can be set up in as a little as 15 minutes.
- My camping experiences – places I have visited, where I stayed, and recommendations if you decide to travel to these locations.
- FOLI – First Out, Last In – When I first arrive at my camping spot, this is the first container I grab. I make sure it is on top and easily accessible.
- Food – What food, meal options, and how I store it.
- Kitchen – It is not a Top Chef kitchen; however, it gives me the space I need to prep, cook, eat and clean up after meals.
- Sleeping Accommodations– For many years a tent was my go-to sleeping set up. A few years ago, I upgraded to a RTT (Roof Top Tent) and now the tent is only used if my RTT is not an option.
- Gear – Other camping gear I bring on a trip, such as personal hygiene or camping in the elements, and how I organize it.
- Camping Links – resources to find camping spots and make reservations in the US, Canada, and around the globe.
Guidealong.com (audio Tour) – I found this app to be reasonably priced, easy to use, entertaining to listen to, and plays relevant information based on my location. I have enjoyed listening to its audio tours while traveling in Grand Teton, Yellowstone, Banff, Jasper, and Lake Louise.
Where I have Camped
I have had the opportunity to camp in a variety of locations with differing amenities – hot shower, pit toilet, stopover in someone’s back yard.
To make things easier to find, I separated out Public Parks from Hipcamps because the experience, reservation system, and information to look for is very different between the two.
Public Parks
- County Parks
- Sanborn Park – Santa Clara, CA
- State Parks
- Big Basin – Boulder Creek, CA
- New Brighton Beach – Capitola, CA
- US National Parks/Forests
- Wyeth Campground – Cascade Locks, OR
- Grand Teton – Moose, WY
- Yellowstone – Yellowstone National Park, WY
- Canada National Parks
- Tunnel Mountain Village 1 – Banff, AB
- Miette Campground – Jasper, AB
- Lake Louise Soft-Sided Trailer/Tent Campground – Lake Louise, AB
Hipcamps
- California
- Fisher – Del Norte, CA
- Root’s End Tent Site – Mendocino, CA
- Oregon
- Forested Creekside Campsite – Grants Pass, OR (my favorite!)
- New! Camp Ashland – Jackson, OR
- Canada
- Northyards Cider Co – Salmon Arm, BC
FOLI – First Out, Last In
After a couple of camping trips, there were certain items I needed every time I arrived at a new camping spot. To ensure they are not lost amongst all of my other camping gear, I created a “FOLI” container. FOLI stands for “First Out, Last In”. It is the first container I take out of my car when I arrive, and it is the last container I pack when I leave. This is what I store in my FOLI container:
My FOLI Items
| FOLI Items |
|---|
| Camping dustpan and broom |
| 2 Flame sticks |
| Goal Zero Lantern |
| 3 – LED Globe Lights |
| Mosquito Coil diffuser with extra coils |
| Mosquito Coils |
| 2 Rechargeable Headlamps |
| RTT (Roof Top Tent) “lipstick” power supply for LED lights in tent |
| Tablecloth with weights |
| 2 Thermcell Rechargeable Mosquito Repeller |
| 3 Thermcell Mosquito Repeller Refills |
Food and Meals
The biggest challenge when camping is how to store and keep food fresh for a long period of time. I used to store my perishables in a 25Qt Igloo BMX Hard Cooler. This would work for about 3-4 days before I would need to add more ice. I have upgraded to a 30Qt Bouge RV Refrigerator, and I can stay off grid for a couple of weeks! If I am doing a quick weekend getaway, I will use the cooler because it takes up less overall space and requires no power.
I store my food a couple of ways. Perishable food is stored in my refrigerator while non-perishable food is placed in a labeled soft sided cooler.
- Refrigerator – mine lives on the rear passenger seat with a power cord running to my EcoFlow River 2 Pro battery located in the rear hatch. The battery is plugged into the rear hatch cigarette lighter and charges whenever I am driving. When I am not driving, it can power the refrigerator for at least 36+ hours (depending on temperature) before I need to charge it back up again. If off-grid charging is required, I use my EcoFlow 160W portable solar panel.
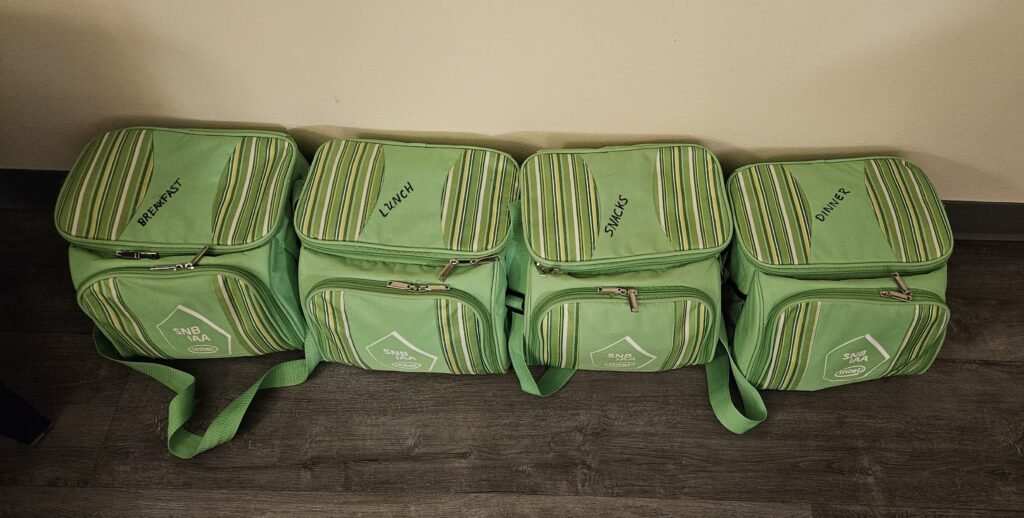
- Soft sided coolers – I have 4 soft sided coolers packed in the rear seat. Each one is labeled – Breakfast, Lunch, Snacks, Dinner – to make it easier to find food based on the meal.
So, what food do I bring and where does it go? Below are my daily meals. It includes the quantity I bring (based on camping with 2 people) and how long it will store. The “Location” column is where I put the food – refrigerator, labeled cooler, or the car. This helps me when packing and as well as finding the food come mealtime.
Breakfast
Type | Breakfast Menu Options |
Fridge | Egg Container – Scrambled eggs – 4 per day w/ Mexican Cheese Add chopped onions and bell peppers, if I have them 1 -8oz Cheese bag/week |
Fridge | Yogurt – 2/day |
Fridge/Dry | Blueberry Scones – 2 per day Scones last ~4 days on counter, ~1wk in the fridge if there is room |
Fridge/Dry | Blueberry muffins – 6 per day Muffins last ~4days on the counter, ~1wk in fridge if there is room |
Dry | Granola to put on yogurt. 1 bag lasts 4 days |
Dry | Krusteaz Instant Pancake Mix, Syrup, Cinnamon Container |
Dry | Coffee/Cappuccino Mix |
Dry | Tea – assume 3 per day |
Lunch
Type | Lunch/Snack Menu Options |
Fridge | Grapes – 1-2wks in the fridge |
Fridge | Cheese – can also be used for pre-Dinner appetizers when paired with crackers |
Fridge/Dry | Apples – 5-7 days on the counter. Fuji Apples seem to last well outside of the Fridge |
Dry | Protein Bar – 2 per day, Trail Mix |
Dry | Granola Bars ~1.75 Bars/Day |
Dry | Herbal Tea – mint, raspberry |
Dry | Almonds – sandwich size bag lasts 2 weeks |
Dry | Pretzels – 1 family size bag will last 1 week |
Dry | Crackers – can also be used for pre-Dinner appetizers when paired with cheese |
Snacks
Location | Snack Items |
Fridge | Grapes |
Fridge | Cheese |
Snacks | Crackers |
Snacks | Pretzels – 1 family size bag per week |
Snacks | Almonds – sandwich sized bag for 2 wks |
Dinner
Type | Dinner Menu Options |
Fridge | Protein: Salmon/Smoked Salmon BBQ Meat (beef or chicken) Pre-Cooked Beef or, Chicken (ex. Kevins) |
Fridge | Veggies Broccoli Salad Grilled Veggies: Onions; Peppers (can be used in scrambled eggs for breakfast) |
Fridge | Corn on the cob |
Fridge | Roasted Garlic (jar) |
Fridge | Lime Juice |
Dry | Starch: Trader Joe’s Harvest Blend; Ready Made Pasta by Barilla |
Dry | Spices – Dried Onions, Olive Oil, Salt, Pepper, Italian Seasonings |
Dry | Soup – for cold days and I am lazy |
Dry | S’mores (per serving, 2ppl): 2 marshmallows; 2 Graham Crackers; 1 Hershey bar |
Dry | Wine |
My kitchen setup
Over the years I have adjusted my cooking setup. My goal is to have the right cooking gear in the smallest space using the least amount of fuel to cook. I have upgraded my propane tanks to be refillable; however, the isobutane tanks are still one and done.
My kitchen set up consists of a cooking table, maybe a BBQ (depends on the length of trip and food access), a couple of Jetboil products, and a cheap 2.5 gallon trashcan from Target for meal prep and after meal cleanup.
What is stored in my cooking bin
When I am planning for any meal, this is the first container I grab. It is a sturdy Rubbermaid Tub that is located on the back seat for easy access.
| Cooking Items |
|---|
| Aluminum Foil |
| Napkins in a ziplock bag |
| Utensil Bag: Bread Knife, Wine Bottle Opener, Shot Glass, Foil Cutter, Wine Bottle Stopper, Cheese Spreader, 4 Complete Sets of Utensils |
| 3 cutting boards |
| Hard Anodized Pot Bag: Anodized Pot with Lid, 1 Isobutane Tank, 2 Handles, Small Cooking Burner, Isobutane Stand, Towel |
| Isobutane tank |
| Jetboil Flash -includes: Burner, Isobutane Stand, Pot Adapter |
| Cooking/BBQ Bag: 2 Marshmellow Skewers, 1 Spatula, ThermoPop Dot Thermometer, 3 Knives (various Sizes), 2 Wooden spoons, Plastic Tipped Tongs, 2 Hot Pads, BBQ Spatula, BBQ Fork |
| Measuring Cup: Food Scraper, Measuring Spoons, Hand Sanitizer |
| 4 Plates and Bowls |
| 3 Trivets |
| 2 Windscreens |
| 2 Wine Glasses |
Other cooking items
If I am bringing the BBQ, then the first 5 items below fit in the Weber Go Anywhere BBQ Box. If the BBQ stays home, then my fire-starting items are stored in a “BBQ-Lite” container.
| Other Cooking Items |
|---|
| Weber Go Anywhere BBQ + BBQ Brush |
| Axe |
| Fire-Starters – 2x number of fires plus dedicated cutting knife (I cut the above fire-starters into quarters so I use only half a block/fire) |
| Firewood tongs – Re-used old tongs from a retired fireplace set |
| 2 – Propane Tanks |
| GCI Master Cook Station w/ sink plug |
| Jetboil Genesis Basecamp – this set up is not cheap; However, it takes very little room and has very fine fidelity on the flame size. |
| Water – 6 gallons is enough for 5 days |
| Wooden shims to use as kindling |
My dining area
Not all of the places I camp have a picnic table. Or, if it does, it is not near the warm fire pit. Here is my setup for a nice cozy meal by the fire.
After meal cleanup
One disadvantage of cooking is there is the cleanup. The trash can is great for wiping left over food into, and I use it for storage when it is not used for trach. Here is what I use to clean up and minimize trash and water usage.
| Meal Cleanup Items |
|---|
| GSI Food Scraper |
| Dish Soap |
| Sea to Summit Folding Bucket – 10L |
| Paper Towels |
| Sink Plug (for the GCI Master Cook Station) |
| Sea to Summit Collapsible Sink – 5L |
| 2 Spray Bottles – one for soap, one for rinse |
| Alcohol & Clorox Wipes – used to wipe and mostly clean plates and bowls |
| 2.5 Gallon Trashcan lined with plastic trash bag |
My sleeping accommodations
I have gone through a variety of tents and my latest tent is used to supplement my RTT (Roof Top Tent) for sleeping. One of my key learnings – when looking for a ground tent – is always buy the tent that is sized for one more person than you will actually sleep in it. Otherwise, the tent is way to small! It is worth the little extra bulk and weight.
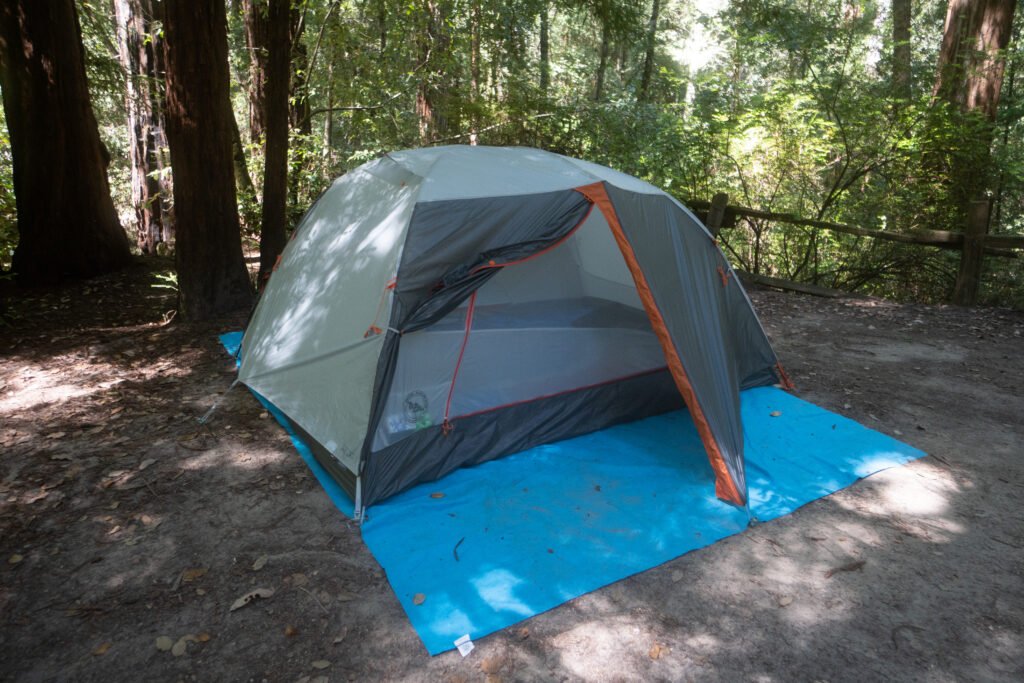
Big Agnes UL3 Mtn Glo – this tent is less than 4lbs, very easy to set up, and packs down small. Yes, it does include the LED lights inside. I wasn’t originally too excited by the idea, but after using them, I love it! The light is not too bright, easy to see while in the tent, and my rechargeable batteries last an entire trip. I bring this tent with me on all my camping trips in the event I am unable to find a location to deploy my RTT.
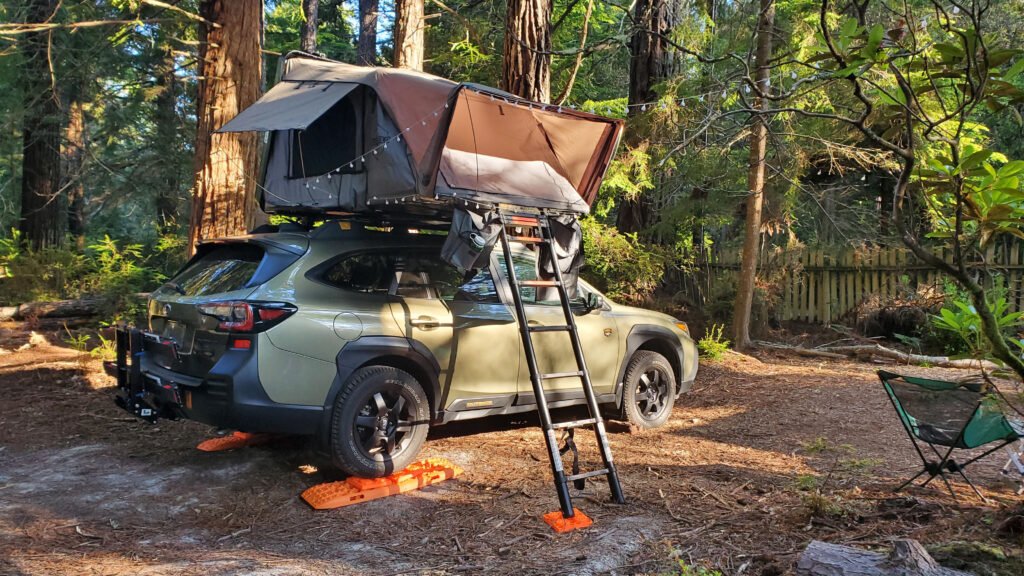
RTT – OVS Bushveld 2 – when closed it is 65″x42″x12″; when open it is 65″x88″x45″. This tent comes with a 2 inch queen size memory foam mattress which is okay; however, adding my 3-inch Therm-a-Rest LuxuryMap mattress on top gives me 5″ of sleeping heaven. Added bonus – if I have to sleep in the tent, I use the same Therm-a-Rests in the tent.
When owning a RTT, the questions I most often receive are, “how do you store it”, and “how do you install it on your car?”. I have made a couple of short videos to show my storage solution and how I install the tent on my car:
- Storing my RTT – when I am not camping, I store my RTT in my garage
- Installing my RTT – the RTT I have is 150 pounds! It takes some work and creativity to install it on the car. Time to install is about 15 minutes with another 15 minutes for final adjustments.
Bedding
Whether I am sleeping in my tent or my RTT, the bedding I use is the same. I purposely set it up this way to minimize what I am carrying and I can easily switch between sleeping arrangements.
| Bedding Items |
|---|
| Sheets – fitted bottom and top sheet – custom sewed to fit 2 Therma-A-Rests side by side |
| 2 Inflatable Pillows |
| 2 Memory foam pillows from Bushveld (came with the RTT) |
| 2 – Therm-a-Rest LuxuryMap mattresses |
| Full size fleece Blanket |
| 2 Individual Fleece blankets – can be used outside around the fire and additional warmth in bed |
| 2 Puffy Comforters sewn together for extra width |
Gear – all of the other things
The biggest challenge I have packing for a trip is making sure I bring what I need but not everything. As I come back from each trip, I update my list and content in each container so I do not have to remember for the next foray into nature.
Besides cooking, bedding, and clothes, what other items do I bring?
HYGIENE!
When I camp, I assume I will not have access to clean, running water. Most of these items live in my “Hygiene” bin.
| Hygene Items |
|---|
| Argon Oil (1oz) |
| Alcohol Wipes in a ziplock bag Can be used to wash face, hands, plates, and a mini bath if no showers are available |
| 2 – Face Towels – Mike and I have different colors |
| 2 – Large Shower Towels – Mike and I have different colors |
| Large Bio-true bottle for contacts |
| Toilet Paper Roll (because you never know….) |
| Shampoo (6 oz) |
| Toothpaste |
| Vanicream Conditioner (3oz) |
| Water |
Camp Comforts
If it is windy. rainy, snowy, hot, whatever, I want to be prepared to protect myself from the elements. I pack the below items every time I camp. Sometimes I use them, sometimes I don’t.
| Camp Comfort Items |
|---|
| Whiffle Golf Ball Bungees (homemade) |
| 12’x14′ Lightweight, Waterproof Tarp |
| In a bag: 14 – Green, reflective tarp ropes 14 – Red, Aluminum Stakes 8 – Silver, Aluminum Stakes 50′ – reflective paracord |
| Telescoping Poles – easy to use and appreciate the protective cap on top |
| ~20 clips for anything that needs securing or hanging (drying clothes) |
| S-Hooks |
| Tent Fan – small in size and rechargeable |
Links to find camping spots
- hipcamp.com – similar to Airbnb except for camping. Tent sites, RVs, glamping – find the perfect site throughout the world.
- Maps | Bureau of Land Management (blm.gov) – where is there free open space to camp in the US. Be aware that there will be no facilities in these locations.
- US Parks Reservations – US National Park Service Reservation System.
- Canada Parks Reservations – Canada National Park Service Reservation System.
- Campflare Reservation Cancellation Notification – notifies me when someone cancels their reservation in a US State or National Park. This is a great way to find a last minute spot.
One final note: Some of the links in this post are affiliate links, which means I earn a small commission at no extra cost to you if you make a purchase. Thank you for supporting my website! – Lori