- Toiletries – limit liquids to travel size containers, find ways to multi-use, and replace with solid form where you can.
- Electronics – optimize cables, chargers and devices and leverage digital alternatives to maps, books, and travel-guides to save weight and space.
- First Aid Kit – for those unexpected medical issues that can occur.
- Miscellaneous Doodads – the little things that make travelling that much easier
Toiletries
Ahh – toiletries…. I personally find the liquid limitation to be the hardest part when travelling. What to bring? What not to bring? How much to bring? Is my product available to buy when I arrive? Will I have time to buy it?
The first thing to do is look at what liquids you use and ask yourself the following:
- Do I NEED this on my trip?
- Is it possible to substitute certain liquids with solid alternatives? There are many shampoos and conditioners available in solid bar form.
- Can certain items have multiple purposes? For example, moisturizer can be hand lotion and facial moisturizer.
Once you have narrowed down your liquids, you will need to determine how much to pack. For example, when preparing for a 5-week trip, fill the containers you plan to bring and use them before you leave (a mini-5-week pseudo vacation). This will help you know if you have enough, too much or too little.
Many travel websites say you can buy what toiletries you need when you arrive. If you have allergies and skin sensitivity like I do, then you will need to be careful on what ingredients are included in soaps, moisturizers, etc. Here is what I have done to minimize my allergies and skin irritation.
- Ivory soap – 1 or 2 bars, depending on the length of the trip. I use Ivory to wash my face, hands, hair, and laundry.
- Moisturizer – CeraVe for sensitive skin. This is my hand and face moisturizer.
- Vanicream Conditioner – I use this mixed with a little Trader Joe’s organic Argon Oil as a leave-in product. I have VERY frizzy hair, and this combination helps (does not eliminate) with the frizz and has minimal extra ingredients.
- Contact Solution – BioTrue is my goto contact solution. I top off my travel size bottle to last me about a week. I then find a larger bottle, hopefully, when I arrive. If not, I use my glasses as a backup.
The Toiletry Bag I use is the Sea to Summit Hanging Toiletry Bag in size small. You can find it on Amazon and REI. I have had this bag for 10 years.; I have stuffed it, thrown it into a variety of travel bags, and it still looks almost new.
Below are all of my toiletries; liquids fit in a quart size bag and then integrated with the rest of my toiletries when I arrive at my destination.
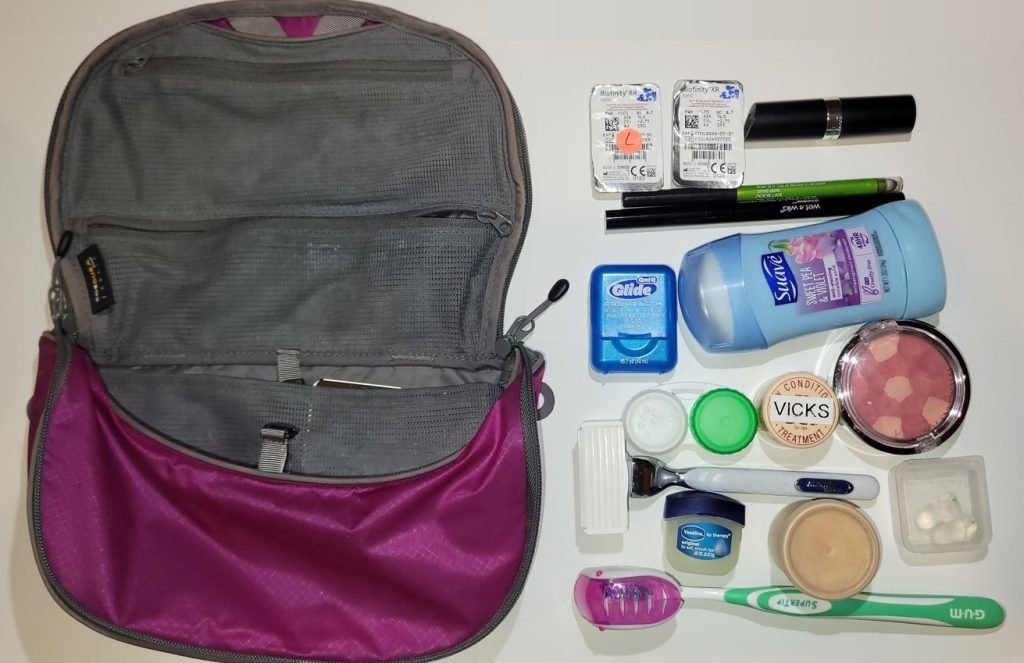
Inside my toiletry bag. Contents are aligned to the pocket they are stored in.
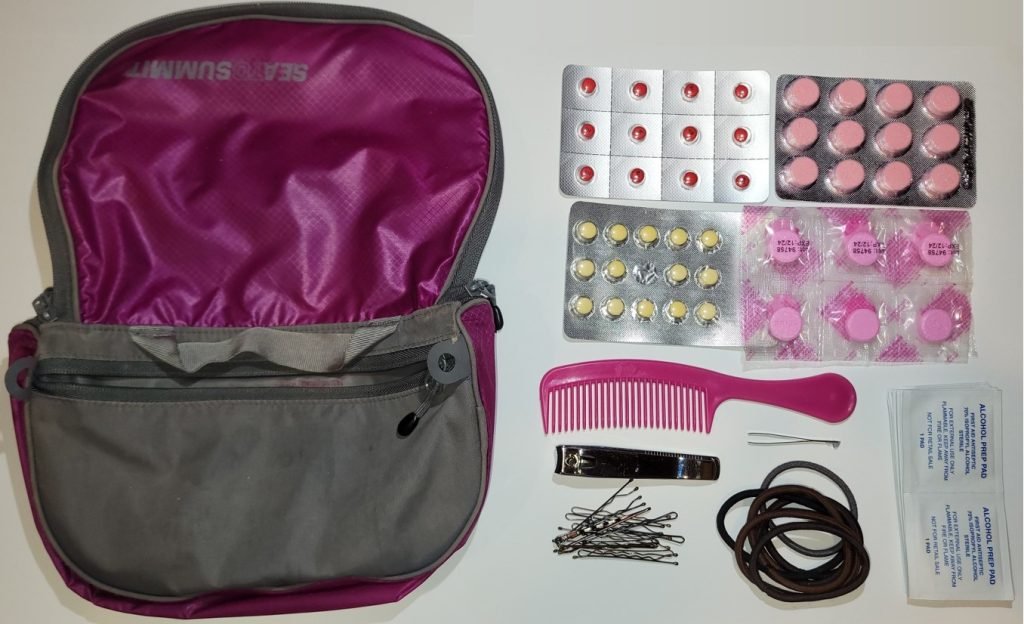
Rear zippered pocket content – I have additional items I want to ensure I have plenty of (in addition to the Travel First Aid Kit),

Electronics
Technology is a blessing and a curse. It enables us to communicate with the rest of the world. capture amazing photos to share with friends and family, and entertains us while we are on a plane, train, or hotel. However, the additional supporting chargers, cables, or storage backup takes up space!
So, where do I start when it comes to planning what to pack? I have 2 categories – what I want immediately accessible while on a plane or train, and what electronics are required when I finally arrive.
For immediate plane/train access, I pack a small bag the contains the following:
- USB-A to USB-C cord that is ~6 feet long.
- 2.0+ amp plug with USB-A output that I can use to charge my devices
- My Bose QC (Quiet Comfort) Headphones
- USB-A data blocker connector – prevents someone hacking and transferring data while I am charging it at the airport, plane, hotel
- Small flashlight from Fenix – it takes a AAA battery and has a good beam for its size.
The remaining electronics are determined by what I need at my final destination. I restrict myself to a 1/4 size packing cube. Below are items I always included:
- 6 foot long extension cord – I have been in too many hotel rooms where the plug is behind a cabinet or there are not enough outlets. This extension cord solves both of those problems.
- camera battery charger.
- USB-A to Micro-USB Cable to connect to the camera battery charger.
- USB-Ato USB-C to charge my 10000mAh battery backup.
- USB-A to USB-C cable to charge my Garmin Messenger
- USB-A Port Replicator that has up to 5, USB-A ports
- Plug adapters for the country(ies) that I am traveling to.
Before I depart on my trip. I download any applicable apps for the areas I am going to – audio guides, tour guides, etc. I also download Google Maps for areas I will be traveling to and want access for when I am offline. And finally, any books or games I may want to use to pass the time when flying or traveling by plane or train.
Travel First-Aid Kit
You will want to put together a small first aid kit that covers most minor medical issues long enough until you are able to reach a pharmacy. Hopefully you will never need it, but when you do, you will be happy you have it. You will want to tailor your first aid kit based on your medical needs – prescriptions, allergies, etc.
This is what my first aid kit looks like. I started with the Adventure Medical Kit, removed anything I would not use, and added additional items relevant to me. I like this first aid bag because it is lightweight and bright yellow. The bright color makes it easy to find when I am digging through all of my belongings. When you build your travel first-aid kit, find a unique colored bag so you can easily find it.
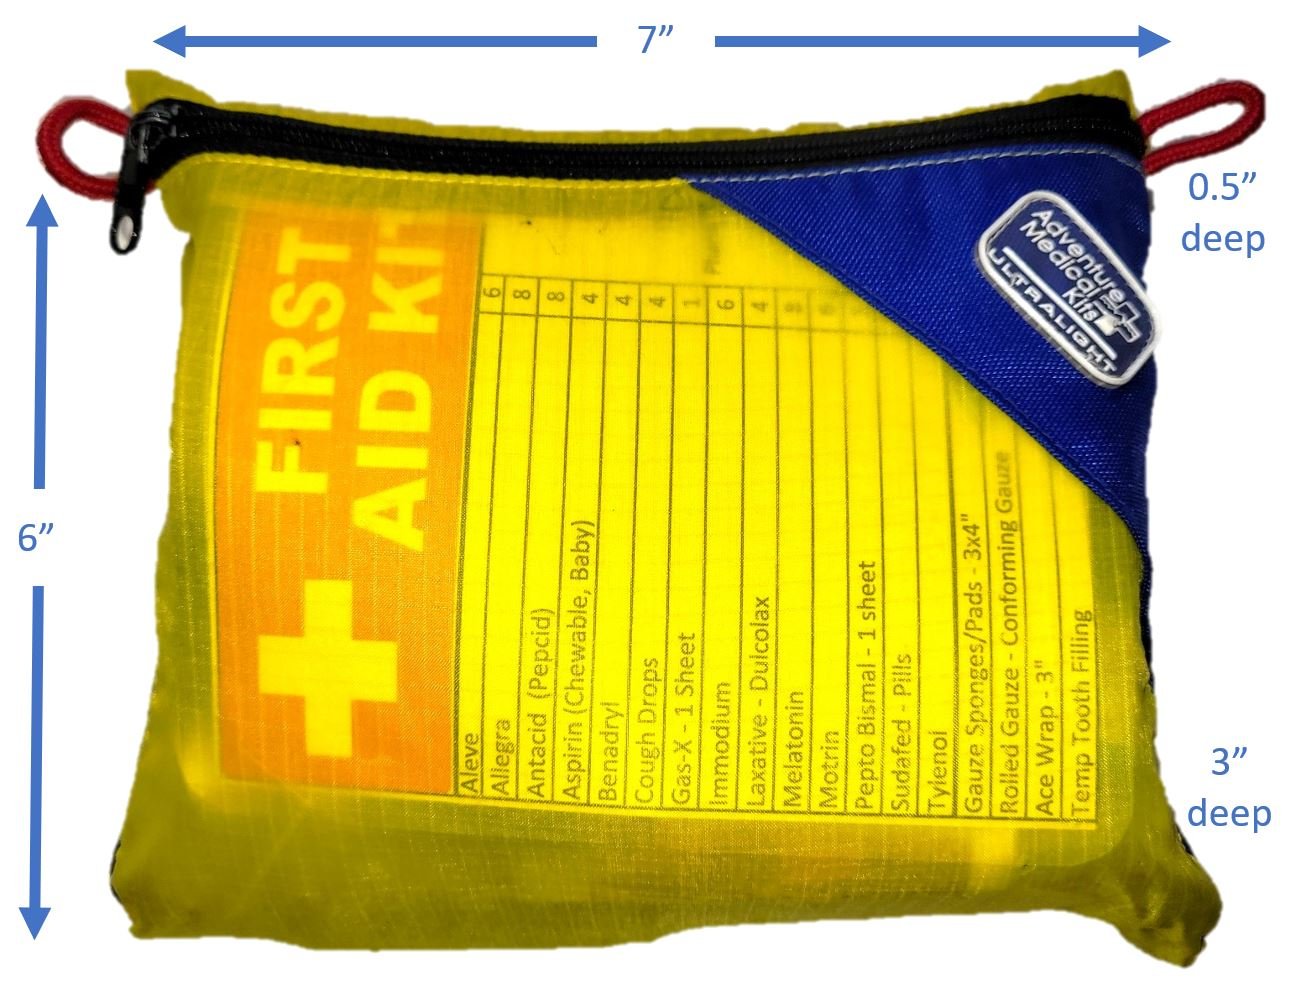
I chose the Adventure Medical Kit because the bag material was lightweight and strong. It also included 2 waterproof pouches inside to help protect my contents from the elements.
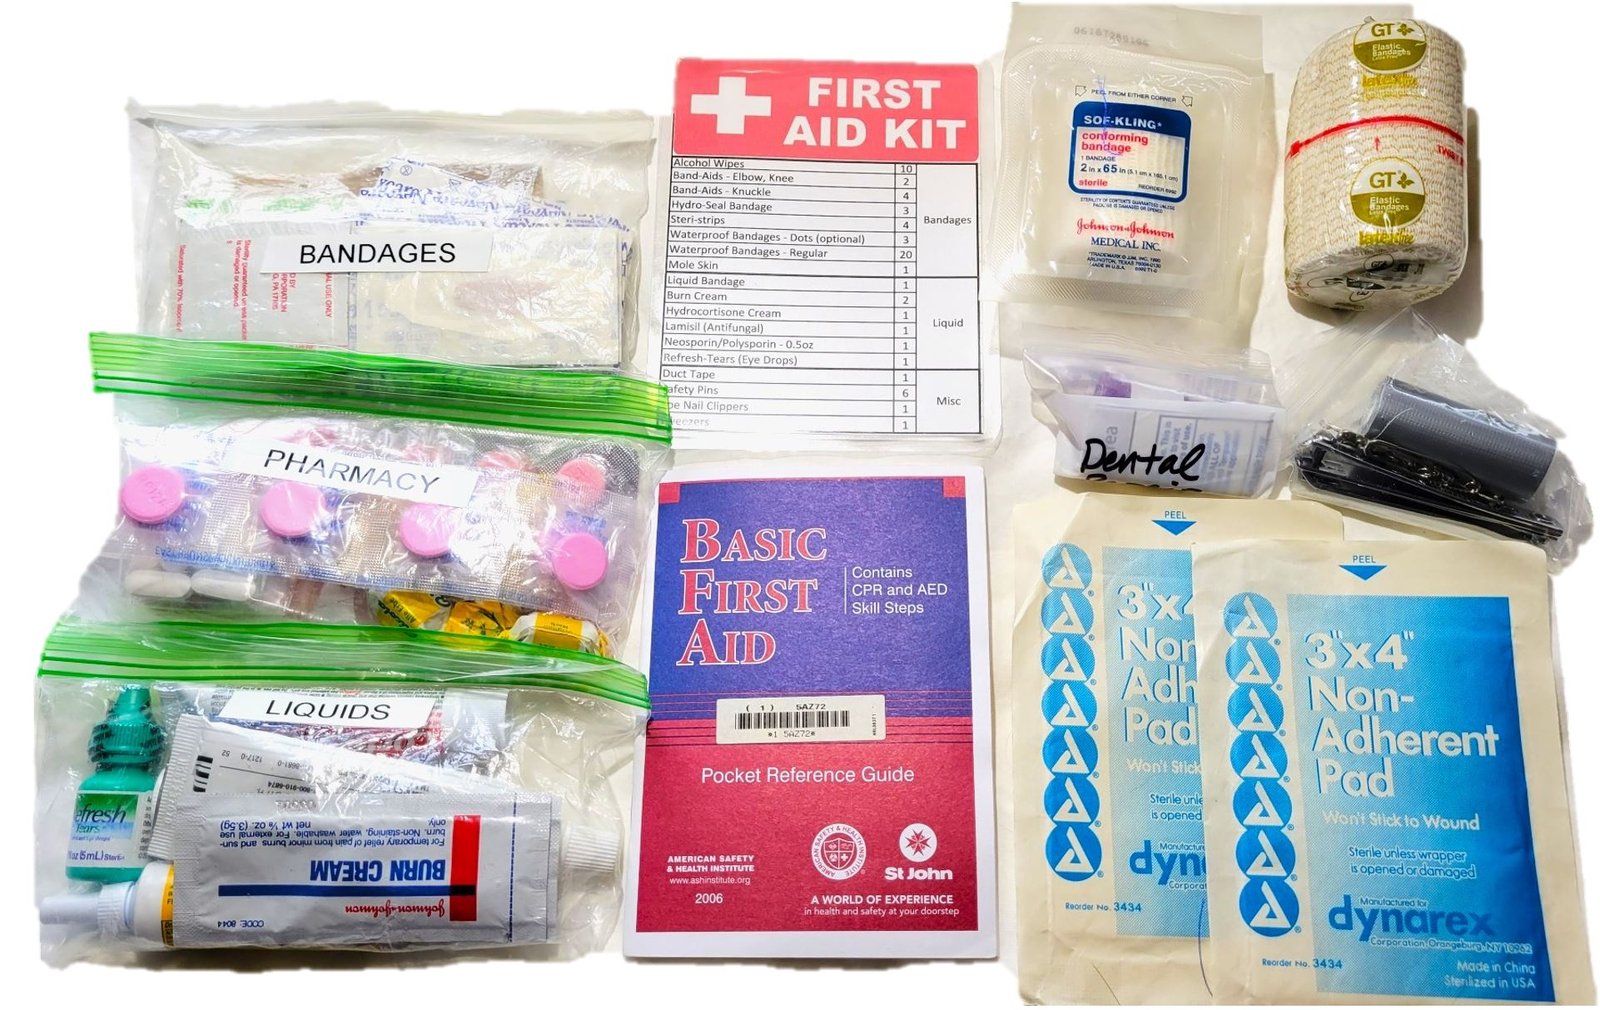
Here are all of the contents I have in my first aid kit. All of the liquids go in single bag to make it easy to include with my TSA liquids. When I arrive at my destination, it is easy to separate it back out and put it back into my first-aid kit.
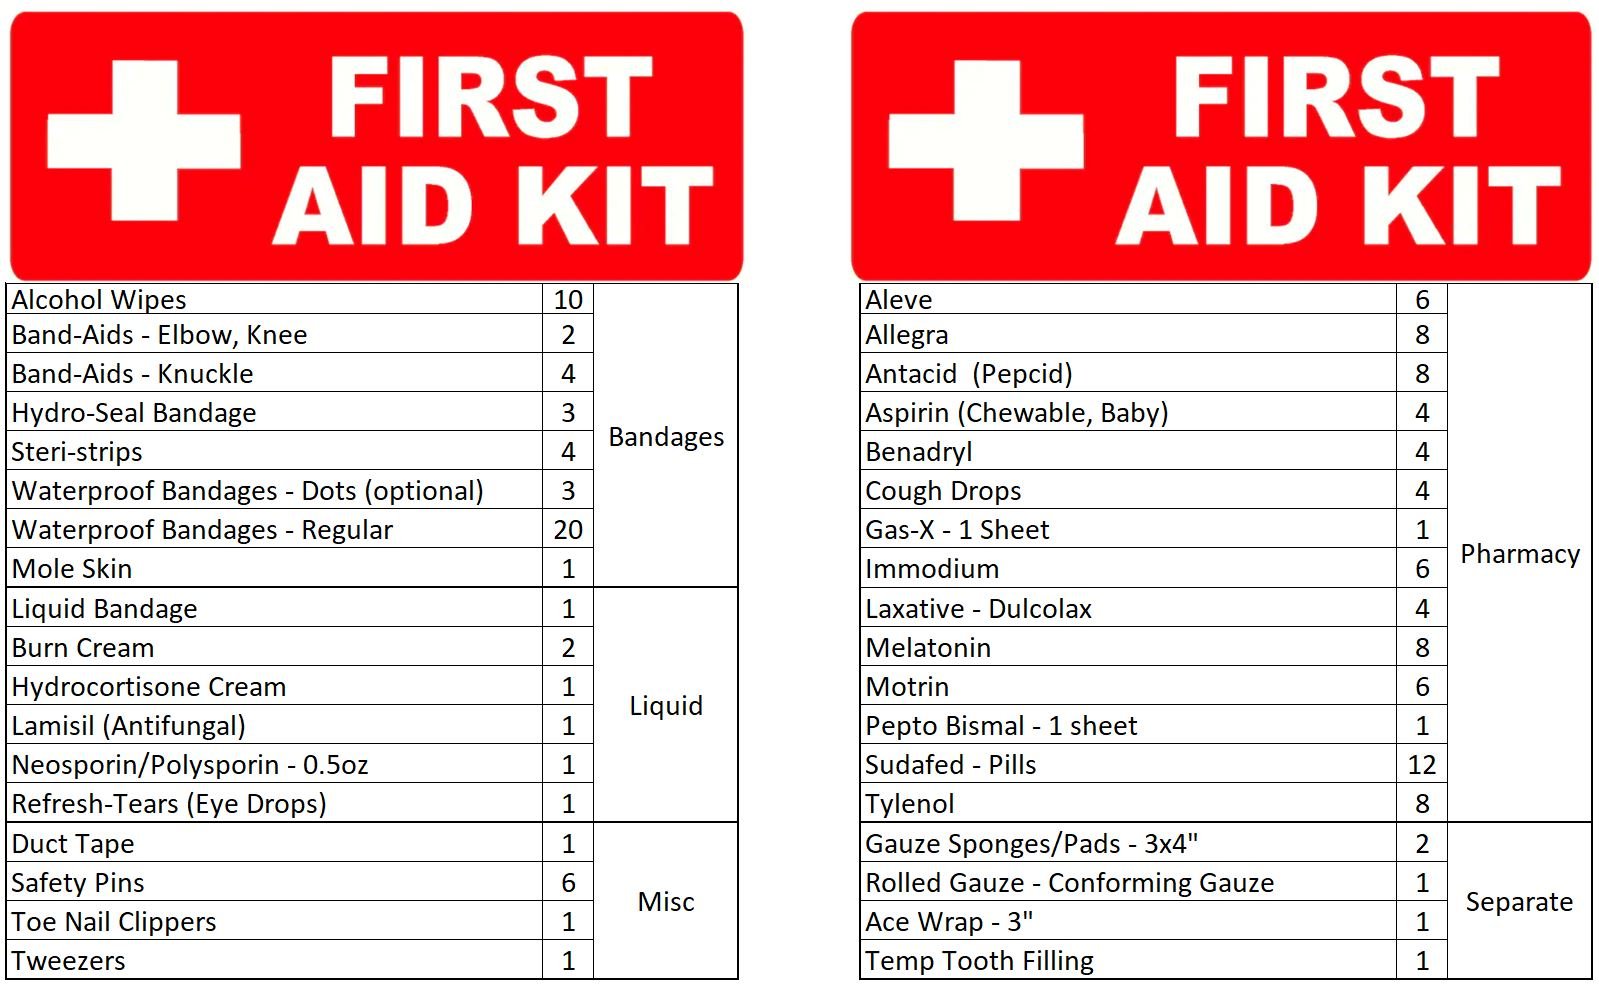
To ensure I do not forget anything each time I travel, I have listed what contents I have in which bag to make things easier to find. The key is to replenish your first aid kit before each trip. You can use this as a starting point and tailor this list to what you need.
Having a Travel first-aid kit can make the difference between continuing to enjoy your vacation versus suffering for a few days until you can find a pharmacy. When I was trying to figure out what to put in my kit, I did a lot of searching online to see what other people created and then customized it for what I needed. I was able to come up with something that has worked (so far). Hopefully this gives you a head start in creating your own travel first-aid kit.
Miscellaneous Doodads
Besides luggage, clothes, toiletries, electronics, and first aid, there are a variety of miscellaneous items that make your travelling experience and vacation feel a little like home. Over the years I have my go to items that I cannot travel without.
- Sleeping on planes, trains, and automobiles
- Travel Rest – the “U” neck pillow gives me a sore neck. With the Travel Rest, I am able to have a sound sleep in economy! Since it is inflatable I can deflate it, roll it up, and pack it out of the way.
- Ear Plugs – given how loud planes can be the ONLY way I can get a decent sleep is with ear plugs. Mine are custom molded; however, Amazon has multiple brands. Look for soft foam that blocks out at least 33 decibels like these.
- Eye Covering – this is a must have! One trip I was seated near the bathroom and the light from the door shown into my eyes every time someone went into the bathroom. NEVER AGAIN!!! Find one that completely covers your eyes and is not too tight.
- Camping Pillow – Trekology Aluft Camping Pillow. Yes, it seems weird to bring a camping pillow. It doesn’t take up much room and I have been so glad to have it when a place has flat pillows. I just add a little air to my camping pillow, put it under the regular pillow inside the pillowcase, and I am all set. I don’t leave home without it.
- Food! I find having food my body is familiar with helps ease into the new environment. I try to pack something that is reasonably healthy, will travel well, and can handle abuse.
- Trail Mix – this is a custom mix of almonds, dried cranberries and a few M&Ms (for that little bit of sugar). You can make your own or find a mix at your local grocery store.
- Granola Bars – if you are traveling to a place that is going to be warm, make sure your granola bars do NOT have a layer of chocolate. Speaking from experience, the chocolate will melt and you will have a mess on your hands
- Coffee! – since I am not a morning person; I need my caffeine before I can be a functioning Homo Sapien. I have my 16oz insulated, no spill coffee mug, an 11oz bag of medium ground coffee, and a fine mesh coffee filter to make my coffee. This setup has worked in a variety of places and it guarantees that I have my pick-me-up in the morning.
- Odor – When traveling for many weeks with the same set of clothes, things will become aromatic. To minimize odors, I throw a hand-made scent bag into each packing cube.
- First, you need a bar of soap. I use Irish Spring because it has a strong smell that I like.
- A secondary benefit of using soap is if you should suddenly need it, you can pull it out one of your scent bags.
- Next, cut up your soap bar so you have cubes that are ~1 inch square.
- Take an old pair of panty hose (or something similar) and put one cube down until it reaches the end of the toe. Tie a knot and cut the nylon. You know have your first scent bag.
- Tie a new knot on the remaining nylon, put a soap cube in, tie a knot, and cut the nylon. Now you have a second scent bag.
- Continue doing this until you have used up all of your soap cubes you have created.
- Distribute them into your packing cubes and you will have fresh smelling clothes throughout your trip.
- First, you need a bar of soap. I use Irish Spring because it has a strong smell that I like.
- Other Items that I bring but I never have a specific use for them:
- Carabiner clips
- 2-3 typical carabiners that can be used to clip everything together.
- 3-4 small, locking carabiners. I have used these to lock up my purse zippers – it forces a thief to do a little extra work before they will be able to access my bag.
- Paracord – about 50 feet (~15 meters). It packs small and can be used for a number of things – laundry line, zipper pull, etc.
- Laundry clips – 10 of these. I use these to keep bags closed or hang laundry.
- “S” Hooks -10 of these when I am on a dive or camping trip. These can be used to hang and dry gear, need to hang a bag/food in a tree, etc. I never know what I will use these for but always find multiple needs for them.
- Carabiner clips
One final note: Some of the links in this post are affiliate links, which means I earn a small commission at no extra cost to you if you make a purchase. Thank you for supporting my website! – Lori